
Running DEWE v2 on AWS
| 发表时间:2015-08-17 05:51:50 | 评论:0 |
[Introduction]
DEWE v2 is a pulling-based workflow execution framework designed with public clouds (for example, AWS) as the target execution environment. With AWS EC2, a homogenous computing environment can be creating by launching a set of EC2 instances with the same instance type in the same availability zone (probably in the same placement group). Statistically, these EC2 instances have the same computing resource in terms of CPU, memory, storage, and networking. DEWE v2 takes advantages of this homogeneity to reduce the scheduling overhead in traditional workflow execution frameworks (such as Pegasus + HTCondor) with a pulling approach. Test results with five 6.0 degree Montage workflows running in parallel indicates that DEWE v2 can achieve 80% speed up as compared to the Pegasus + HTCondor solution on a single node cluster.
DEWE v2 was first published on the 44th International Conference on Parallel Processing (ICPP-2015) in Beijing (China) in the following paper:
Qingye Jiang, Young Choon Lee, Albert Y. Zomaya, "Executing Large Scale Scientific Workflow Ensembles in Public Clouds", 44th International Conference on Parallel Processing (ICPP-2015), Beijing, September 2015
This blog post provides a Getting Started guide on running DEWE v2 on AWS.
[Single Node Configuration]
To get started with DEWE v2, you will need to have an account on AWS. In your EC2 Console, navigate to the N. Virginia (us-east-1) region and click on the blue "Launch Instance" button. In "Step 1: Choose an Amazon Machine Image (AMI)" page, click on "Community AMIs" and search for "DEWE.v2 ICPP", you will be able to find the demo AMI we prepared for ICPP 2015, as shown in the screen capture below.
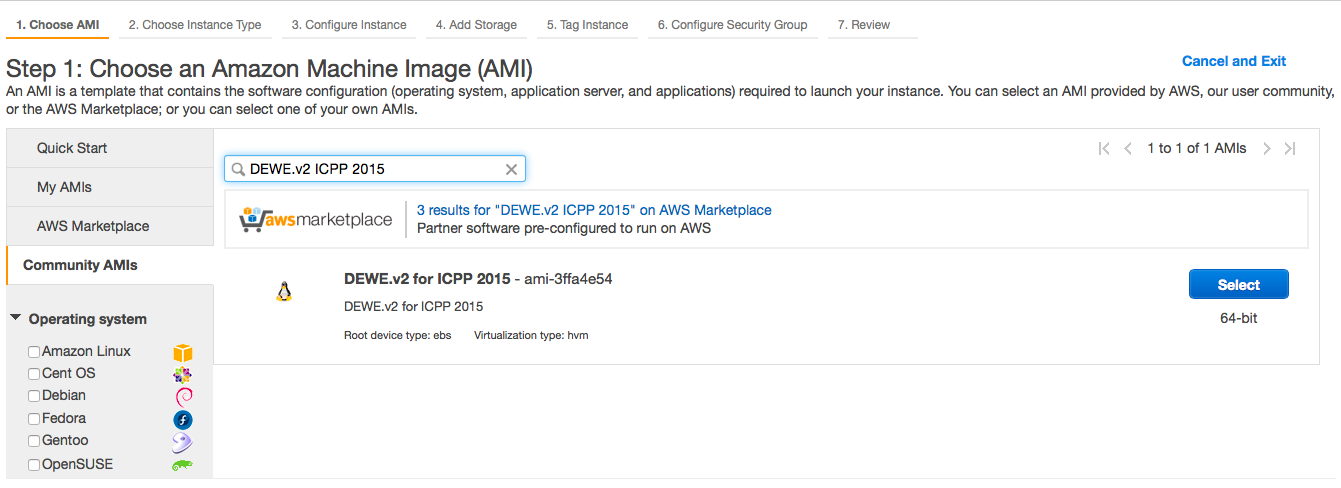
Select the AMI with the name "DEWE.v2 for ICPP 2015" and proceed to "Step 2: Choose an Instance Type". In this tutorial, please use r3.xlarge or a larger instance type, because we will need some decent instance-store storage volume to run a 6.0 degree Montage workflow as an example. In "Step 3: Configure Instance Details", you will need to launch the instance into a public subnet with a public IP address, this way you can SSH into the instance to run DEWE v2. In "Step 4: Add Storage" please make sure that you add the instance-store volume (Instance Store 0) to the EC2 instance, otherwise the EC2 instance will be launched without the instance-store volume. If you need assistance in getting started with AWS EC2, please refer to the following AWS Documentations:
Getting Started with Amazon EC2 Linux Instances
Connecting to Your Linux Instance Using SSH
When the EC2 instance becomes "running" and passes 2/2 health checks, SSH into the EC2 instance using username "ubuntu" with your key pair. First of all we will format and mount the instance-store volume, then copy the example 6.0 degree Montage workflow to the instance-store volume, as below:
sudo mkfs.ext4 /dev/xvdb

sudo mount /dev/xvdb /data

sudo chown -R ubuntu:ubuntu /data

cd /data
cp ~/TestData/DEWE.v2_Montage_6.0_Example.tar.gz .
tar zxvf DEWE.v2_Montage_6.0_Example.tar.gz
cd ~/DEWE.v2/bin
Now we have the example 6.0 degree Montage workflow in the /data/DEWE.v2_Montage_6.0_Example folder. We will go ahead and set up DEWE v2 so that it will run. First we run "ifconfig eth0" to determine the private IP address of the EC2 instance. Then we edit config.properties and replace "master=10.0.4.15" with the correct private IP address of your EC2 instance. Apart from that, you don't need to change any other parameters in this config file.
Now run the following command to start the DEWE v2 master daemon, worker daemon, and monitoring daemon. When starting the monitoring daemon, you will need to specify which storage volume to monitor. In this example, we are using instance-store volume /dev/xvdb to host the workflow. Therefore, we use "xvdb" as the parameter for the monitoring daemon:
./dewe.sh master start

./dewe.sh worker start

./dewe.sh monitor xvdb start
In the same folder, you will notice that each daemon produces a PID file containing the pid of the process (for example, master.pid, worker.pid, and monitor.pid), as well as a log file containing the output from the process. The file name of the log file contains the private IP address of the EC2 instance, as well as the date and time the daemon is started (for example, worker-ip-172-31-27-138-2015-08-15-10-02-31.log).
Now we submit the example 6.0 degree Montage workflow to DEWE v2 for execution. The format of the command is "./dewe.sh submit workflow_name workflow_folder". For example:
./dewe.sh submit Montage_6.0 /data/DEWE.v2_Montage_6.0_Example
You can check the status of the execution using the "./dewe.sh status" command. For example:
./dewe.sh status
You might see multiple entries of workflows in the status output. Those are the records from our own testings. You will need to look at the time stamps to determine which entry is really your own workflow.
You can use the "top" or "isolate 1" commands to observe what your EC2 instance is doing while running your workflow. On an r3.xlarge instance, you should expect around 25 minutes before DEWE v2 finishes executing a 6.0 degree Montage workflow. (A 6.0 degree Montage workflow contains 8,586 jobs, 1,444 input files with a total size of 4.0 GB, and 22,850 intermediate files with a total size of 35 GB. The majority of these 8,586 jobs are copies of a few short-running jobs such as mProjectPP, mDiffFit and mBackground.)
top

iostat 1
When the execution of the workflow is completed, you can stop the master, worker, and monitoring daemons using the following commands:
./dewe.sh master stop

./dewe.sh worker stop

./dewe.sh monitor xvdb stop
At this point it would be worthwhile to look into the log files produced by the various daemons. In particular, you should look into the log file produced by the monitoring daemon to understand the status of computing resource utilization. The fields in this log file include UNIX timestamp (in seconds), the average number of concurrent threads observed on the operating system level, the percentage of CPU utilization, the number of disk I/O operations (the sum of reads and writes) per second, disk read throughput (KB/s), and disk write throughput (KB/s).
After you finish this exercise, you should terminate the EC2 instance in a timely manner to avoid further charges.
[Multi-Node Configuration]
In this step, we will create a more complex set up - a cluster with three compute nodes with MooseFS (a POSIX-compliant distributed file system) as the underlying storage. In order to do so, we will launch a separate MooseFS master node to manage the storage nodes. The storage nodes will be at the same time DEWE v2 worker nodes. One of the worker nodes also acts as the DEWE v2 master node by running the DEWE v2 master daemon.
We will need to launch the MooseFS master node first. In your EC2 Console, navigate to the N. Virginia (us-east-1) region and click on the blue "Launch Instance" button. In "Step 1: Choose an Amazon Machine Image (AMI)" page, click on "Community AMIs" and search for "DEWE.v2 MooseFS", you will be able to find the demo AMI we prepared for ICPP 2015, as shown in the screen capture below. You will need to select the AMI with the name "DEWE.v2 MooseFS Master for ICPP 2015". The MooseFS master node does not need a whole lot of processing power, so I select a t2.medium instance type for this exercise.
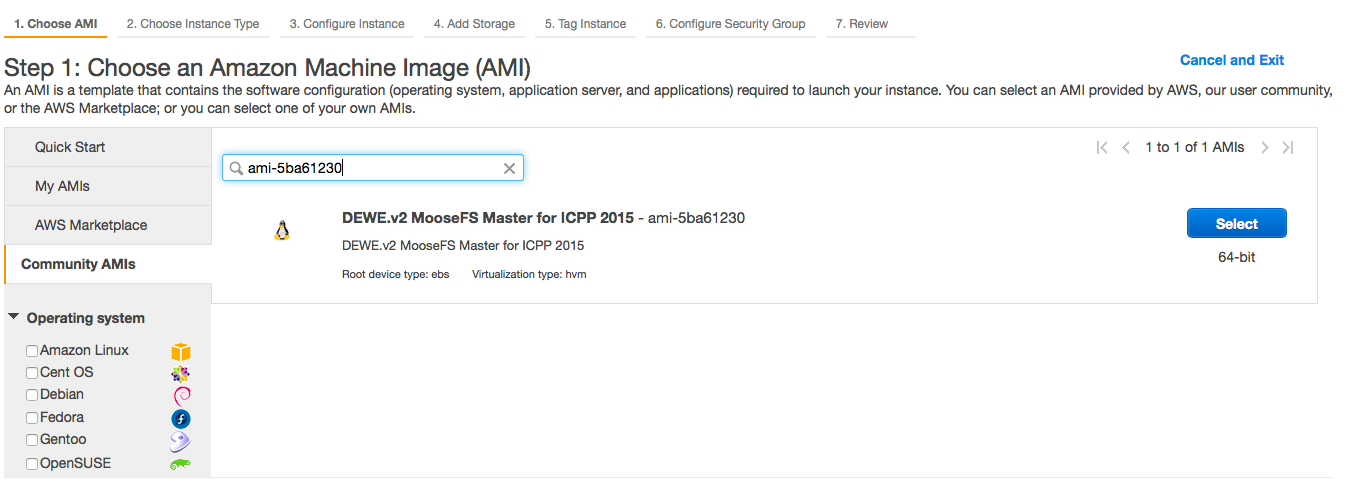
Now SSH into the MooseFS master node. The first thing you will need to do is to use the "ifconfig eth0" command to figure out the private IP address of the MooseFS master node. Then you will need to edit /etc/hosts and update the IP address for "mfsmaster" with this private IP address. After that you will need to run the following commands:
cd /var/lib/mfs

sudo cp metadata.mfs.back metadata.mfs

sudo service moosefs-ce-master start

mfscli -SCS
If you see outputs similar to the following, your MooseFS master node is now successfully running.

Now we will launch three additional EC2 instances to run DEWE v2. Similar to what we do in the single node configuration, we click on "Community AMIs" and search for "DEWE.v2 ICPP 2015" to search for the AMI to use. In "Step 2: Choose an Instance Type" we choose c3.2xlarge, which has 2 x 40 GB instance-store volumes. In "Step 3: Configure Instance Details" we specify 3 for the number of instances, this way we do not need to launch 3 instances one by one (which is not a problem but troublesome). On the same page, we click on "Advanced Details", and paste the following into the text area for "User data". It should be noted that you should replace 172.31.31.83 with the private IP address of your MooseFS master node.
#!/bin/bash

cd /home/ubuntu/bin

./mfs_setup.sh 2 172.31.31.83
In "Step 4: Add Storage", please make sure that you have both "Instance Store 0" and "Instance Store 1" for your EC2 instance. Otherwise the above-mentioned cloud-init script will fail. (If you login to the EC2 instance and take a look at the content of /home/ubuntu/bin/mfs_setup.sh, you will see that the shell scripts takes two parameters - the first parameter indicates the number of instance-store volumes (0, 1 or 2), and the second parameters indicates the private IP address of the MooseFS master node. If you select an instance type with only 1 instance-store volume, the command to use will be "./mfs_setup.sh 1 172.31.31.83".)
It is very important that the security group being used on the MooseFS master node and the security group being used on the DEWE v2 compute nodes should allow all traffic between the MooseFS master node and the DEWE v2 compute nodes.
After the DEWE v2 compute nodes became "running", you should be able to see outputs similar to the following on your MooseFS master node. The MooseFS master node sees three storage nodes, and uses the disk space (/mfshdd) on the the storage nodes to form a shared file system. The shared file system is mounted on each of the three storage as /FoxData.

Randomly select any one of the three DEWE v2 compute nodes to run the DEWE v2 master daemon. SSH into this node using username "ubuntu", do an "ifconfig eth0" to determine its private IP address. Then we edit config.properties and replace "master=10.0.4.15" with the correct private IP address of your EC2 instance. Apart from that, you don't need to change any other parameters in this config file. Copy config.properties to /FoxData so that the other two compute nodes can copy it from the shared file system.
cd ~/DEWE.v2/bin

pico config.properties        # This is to edit the configuration file

cp config.properties /FoxData
Now copy some test data to the shared file system:
cd /FoxData/

cp ~/TestData/DEWE.v2_Montage_6.0_Example.tar.gz .

tar zxvf DEWE.v2_Montage_6.0_Example.tar.gz

cp -r DEWE.v2_Montage_6.0_Example Test-1

cp -r DEWE.v2_Montage_6.0_Example Test-2
Now we have two 6.0 degree Montage workflows for testing (Test-1 and Test-2). After that, we start the master, worker, and monitoring daemon, using the following commands:
cd ~/DEWE.v2/bin

./dewe.sh master start

./dewe.sh worker start

./dewe.sh monitor md0 start   # This time we monitor the RAID0 device /dev/md0
Now SSH into the other two DEWE v2 compute nodes, copy the configuration file configure.properties from /FoxData, then start the worker and monitoring daemons (no master daemon).
cd ~/DEWE.v2/bin

cp /FoxData/config.properties .

./dewe.sh worker start

./dewe.sh monitor md0 start   # This time we monitor the RAID0 device /dev/md0
On any of the three DEWE v2 compute nodes, submit the test workflows for execution, using the following commands:
cd ~/DEWE.v2/bin

./dewe.sh submit Test-1 /FoxData/Test-1

./dewe.sh submit Test-2 /FoxData/Test-2
On any of the DEWE v2 compute nodes, check the execution status of your workflows using the following commands:
cd ~/DEWE.v2/bin

./dewe.sh status
You can use the "top" or "isolate 1" commands to observe what your EC2 instance is doing while running your workflow. On a cluster with 3 x c3.xlarge compute nodes with MooseFS as the underlying distributed file system, the time needed to execute two 6.0 degree Montage workflows is around 25 minutes. After the workflows are completed, back up the log files on all three DEWE v2 compute nodes to a persistent storage (such as AWS S3) for further analysis. Please remember to terminate all the EC2 instances (the MooseFS master node, and the three DEWE v2 compute nodes) to avoid further charges.
If you want to clean up disk space on the MooseFS shared file system by deleting some folders (in our example, sub-folders under /FoxData), you will need to run a "mfssettrashtime -r 0 folder_name" against the folder you want to delete. The reason is that by default MooseFS does not delete your files from the underlying storage when you issue a "rm" command. Instead, MooseFS simply hides the "deleted" files from you, but keeps them in a trash folder for future recovery. As a result, you do not get your disk space back after issuing a "rm" command, which is very confusing. By running a "mfssettrashtime -r 0 folder_name" command, you tell MooseFS to keep the deleted files for 0 seconds. For example, if you want to delete sub-folder Test-1 completely from /FoxData, you will need to use the following commands:
cd /FoxData

mfssettrashtime -r 0 Test-1

rm -Rf Test-1
Apart from MooseFS, there are several distributed file systems that are commonly used in scientific computing and high performance computing, for example GlusterFS and XtreemFS. In the demo AMI we provided, we have installed MooseFS, GlusterFS, and XtreemFS for you. However, you still need to properly set up and configure the distributed file system before using them. For more information on this topic, please refer to my previous blog entries:
Distributed File System on Amazon Linux - MooseFS
Distributed File System on Amazon Linux - GlusterFS
Distributed File System on Amazon Linux - XtreemFS
[Creating Your Own Workflow]
In this step, we will show you how to create your own workflow that can be executed by DEWE v2. We used the example as shown in the directed acyclic graph (DAG) below to illustrate this process. The entry task of the workflow is a "Sleep" task, which simply sleep for a random amount of time (0 to 100 seconds). Before the "Sleep" task is completed, no other task can be executed. After the "Sleep" task is completed, two "Sleep & Record" tasks will run in parallel, each sleeps for a random amount of time (0 to 100 seconds), and records the random number into it's own output file a.dat and b.dat. After both "Sleep & Record" tasks are completed, exit task "Add" adds the outputs in a.dat and b.dat, producing a final output file c.dat.
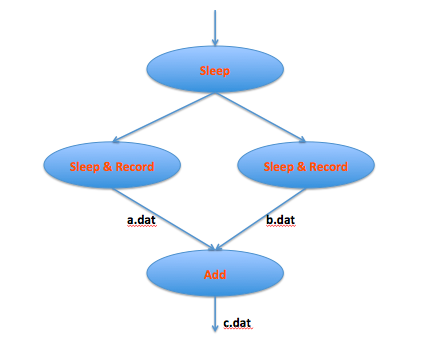
The workflow for this simple demo can be found on the DEWE v2 compute node in /home/ubuntu/TestData/DEWE.v2_Simple_Demo.tar.gz. You can run this simple demo with the following commands (assuming that /FoxData is the shared file system across all DEWE v2 compute nodes):
cd /FoxData

cp ~/TestData/DEWE.v2_Simple_Demo.tar.gz .

tar zxvf DEWE.v2_Simple_Demo.tar.gz

cd ~/DEWE.v2/bin

./dewe.sh submit Simple_Demo /FoxData/DEWE.v2_Simple_Demo
After the workflow is completed, you should be able to see a.dat, b.dat, and c.dat under folder /FoxData/DEWE.v2_Simple_Demo/workdir.
Now let's explain the directory structure of a DEWE v2 workflow. Under the project folder, there are three sub-folders - the bin folder contains the executables, the src folder (optional) contains the source code, and the workdir folder (initially empty) contains the input and and output files. Apart from the three folders, dag.xml is the XML representation of the DAG of the workflow, while timeout.xml is the XML representation of the timeout settings for each task.
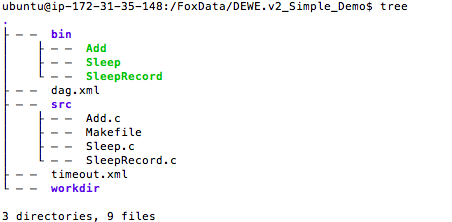
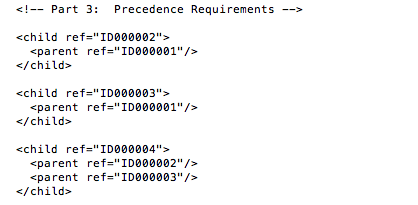
The dag.xml usually contains three parts. The first part describes the input and output files, the second part describes each job and the arguments, and the third part describes the precedence dependencies between jobs.
The input and output files are describe as below. a.dat is the output file of a task but is also the input file of another task. b.dat is the output file of a task but is also the input file of another task. c.dat is the output file of a task. (If there is an original input file in the "workdir" folder, then it should be marked as "input".)

The jobs and their arguments are described as below. The executable binary for job ID000001 is "Sleep", and this job has no arguments. The executable binary for job ID000002 is "SleepRecord", and the argument for this job is "a.dat". The executable binary for job ID000003 is "SleepRecord", and the argument for this job is "b.dat". The executable binary for job ID000004 is "Add", and the arguments for this job are "a.dat", "b.dat", and "c.dat" in the sequence as they appear in the command line.
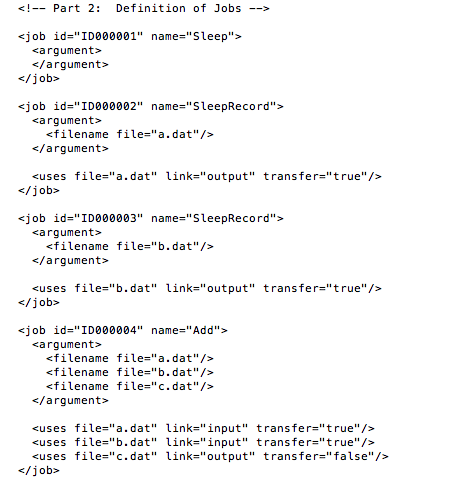
The execution directory (current directory) for the jobs is the "workdir" folder. For each job, you can imagine that DEWE v2 first "cd" into the "workdir" folder, then execute the command (with full path) along with the command line arguments. For example, for job ID000004, its execution is similar to the following:
cd /FoxData/DEWE.v2_SimpleDemo/workdir

/FoxData/DEWE.v2_SimpleDemo/Add a.dat b.dat c.dat
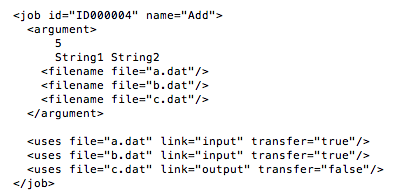
Assuming that your job ID000004 takes more than the above-mentioned arguments, you can following this example to describe your job. You can put each argument into one line, or multiple arguments into the same line. In the example below, its execution will be similar to the following:
cd /FoxData/DEWE.v2_SimpleDemo/workdir

/FoxData/DEWE.v2_SimpleDemo/Add 5 String1 String2 a.dat b.dat c.dat
The precedence dependencies are described as below. Job ID000002 and ID000003 are child jobs of job ID000001. They can not start execution until job ID000001 is completed. Job ID000004 is a child job of both job ID000002 and job ID000003. It can not start execution until both job ID000002 and job ID000003 are completed.
Configuration file timeout.xml defines the timeout period for some special jobs, while the default timeout period for all jobs is defined in the DEWE v2 configuration file config.properties. In the example below, the timeout period for job name "Sleep" is 150 seconds, while the timeout period for job name "SleepRecord" is 200 seconds. If a particular job has been running for more than its timeout period, DEWE v2 will resubmit the job for execution.

[Acknowledgements]
This work is supported by the AWS in Education Research Grants. Dr. Young Choon Lee would like to acknowledge the support of the Australian Research Council Discovery Early Career Researcher Award (DECRA) Grant DE140101628.
Running cxxnet on Amazon EC2 (Ubuntu 14.04)
| 发表时间:2015-08-09 08:47:06 | 评论:2 |
1. Launch an EC2 instance with the g2.8xlarge instance type, using a Ubuntu 14.04 HVM AMI. When I launched the EC2 instance, I used a root EBS volume of 300 GB (General Purpose SSD) to have a decent disk I/O capacity. With general purpose SSD, you have 3 IOPS for each GB of storage. So 300 GB storage gives me 900 baseline IOPS, with the capability to burst up to 3000 IOPS for an extended period of time.
2. SSH into the EC2 instance and install CUDA driver, as below:
There is a detailed tutorial on this topic available on Github:
https://github.com/BVLC/caffe/wiki/Install-Caffe-on-EC2-from-scratch-(Ubuntu,-CUDA-7,-cuDNN)
3. Install OpenBLAS, as below
$ sudo apt-get install make gfortran

$ wget http://github.com/xianyi/OpenBLAS/archive/v0.2.14.tar.gz

$ tar zxvf v0.2.14.tar.gz

$ cd OpenBLAS-0.2.14

$ make FC=gfortran

$ sudo make PREFIX=/usr/local/ install

$ cd/usr/local/lib

$ sudo ln -s libopenblas.so libblas.so
4. Install OpenCV
There is a detailed documentation available from the Ubuntu community:
https://help.ubuntu.com/community/OpenCV
You will also need to install the header files for OpenCV
$ sudo apt-get install libopencv-dev
3. Install cxxnet, as below
$ cd ~

$ wget https://github.com/dmlc/cxxnet/

$ cd cxxnet

$ ./build.sh
In most cases, the build will fail. You need to customize your Makefile a little bit to reflect the actual situation of your build environment. Below is an example from my environment:
CFLAGS += -g -O3 -I./mshadow/ -I./dmlc-core/include -I/usr/local/cuda/include -I/usr/include -fPIC $(MSHADOW_CFLAGS) $(DMLC_CFLAGS)

LDFLAGS = -pthread $(MSHADOW_LDFLAGS) $(DMLC_LDFLAGS) -L/usr/local/cuda/lib64 -L/usr/local/lib
Then do the make again:
$ make

g++ -DMSHADOW_FORCE_STREAM -Wall -g -O3 -I./mshadow/ -I./dmlc-core/include -I/usr/local/cuda/include -I/usr/include -fPIC -msse3 -funroll-loops -Wno-unused-parameter -Wno-unknown-pragmas -DMSHADOW_USE_CBLAS=1 -DMSHADOW_USE_MKL=0 -DMSHADOW_RABIT_PS=0 -DMSHADOW_DIST_PS=0 -fPIC -DDMLC_USE_HDFS=0 -DDMLC_USE_S3=0 -DDMLC_USE_AZURE=0 -DCXXNET_USE_OPENCV=1 -DCXXNET_USE_OPENCV_DECODER=1 -fopenmp   -o bin/cxxnet src/local_main.cpp layer_cpu.o updater_cpu.o nnet_cpu.o main.o nnet_ps_server.o data.o dmlc-core/libdmlc.a layer_gpu.o updater_gpu.o nnet_gpu.o -pthread -lm -lcudart -lcublas -lcurand -lblas -lrt -L/usr/local/cuda/lib64 -L/usr/local/lib `pkg-config --libs opencv` -ljpeg

g++ -DMSHADOW_FORCE_STREAM -Wall -g -O3 -I./mshadow/ -I./dmlc-core/include -I/usr/local/cuda/include -I/usr/include -fPIC -msse3 -funroll-loops -Wno-unused-parameter -Wno-unknown-pragmas -DMSHADOW_USE_CBLAS=1 -DMSHADOW_USE_MKL=0 -DMSHADOW_RABIT_PS=0 -DMSHADOW_DIST_PS=0 -fPIC -DDMLC_USE_HDFS=0 -DDMLC_USE_S3=0 -DDMLC_USE_AZURE=0 -DCXXNET_USE_OPENCV=1 -DCXXNET_USE_OPENCV_DECODER=1 -fopenmp   -o bin/im2rec tools/im2rec.cc dmlc-core/libdmlc.a -pthread -lm -lcudart -lcublas -lcurand -lblas -lrt -L/usr/local/cuda/lib64 -L/usr/local/lib `pkg-config --libs opencv` -ljpeg

g++ -DMSHADOW_FORCE_STREAM -Wall -g -O3 -I./mshadow/ -I./dmlc-core/include -I/usr/local/cuda/include -I/usr/include -fPIC -msse3 -funroll-loops -Wno-unused-parameter -Wno-unknown-pragmas -DMSHADOW_USE_CBLAS=1 -DMSHADOW_USE_MKL=0 -DMSHADOW_RABIT_PS=0 -DMSHADOW_DIST_PS=0 -fPIC -DDMLC_USE_HDFS=0 -DDMLC_USE_S3=0 -DDMLC_USE_AZURE=0 -DCXXNET_USE_OPENCV=1 -DCXXNET_USE_OPENCV_DECODER=1 -fopenmp   -o bin/bin2rec tools/bin2rec.cc dmlc-core/libdmlc.a -pthread -lm -lcudart -lcublas -lcurand -lblas -lrt -L/usr/local/cuda/lib64 -L/usr/local/lib `pkg-config --libs opencv` -ljpeg

g++ -DMSHADOW_FORCE_STREAM -Wall -g -O3 -I./mshadow/ -I./dmlc-core/include -I/usr/local/cuda/include -I/usr/include -fPIC -msse3 -funroll-loops -Wno-unused-parameter -Wno-unknown-pragmas -DMSHADOW_USE_CBLAS=1 -DMSHADOW_USE_MKL=0 -DMSHADOW_RABIT_PS=0 -DMSHADOW_DIST_PS=0 -fPIC -DDMLC_USE_HDFS=0 -DDMLC_USE_S3=0 -DDMLC_USE_AZURE=0 -DCXXNET_USE_OPENCV=1 -DCXXNET_USE_OPENCV_DECODER=1 -fopenmp  -shared -o wrapper/libcxxnetwrapper.so wrapper/cxxnet_wrapper.cpp layer_cpu.o updater_cpu.o nnet_cpu.o main.o nnet_ps_server.o data.o dmlc-core/libdmlc.a layer_gpu.o updater_gpu.o nnet_gpu.o -pthread -lm -lcudart -lcublas -lcurand -lblas -lrt -L/usr/local/cuda/lib64 -L/usr/local/lib `pkg-config --libs opencv` -ljpeg
Now we can run an example:
$ cd example/MNIST

$ ./run.sh MNIST_CONV.conf

libdc1394 error: Failed to initialize libdc1394

Use CUDA Device 0: GRID K520

finish initialization with 1 devices

Initializing layer: cv1

Initializing layer: 1

Initializing layer: 2

Initializing layer: 3

Initializing layer: fc1

Initializing layer: se1

Initializing layer: fc2

Initializing layer: 7

SGDUpdater: eta=0.100000, mom=0.900000

SGDUpdater: eta=0.100000, mom=0.900000

SGDUpdater: eta=0.100000, mom=0.900000

SGDUpdater: eta=0.100000, mom=0.900000

SGDUpdater: eta=0.100000, mom=0.900000

SGDUpdater: eta=0.100000, mom=0.900000

node[in].shape: 100,1,28,28

node[1].shape: 100,32,14,14

node[2].shape: 100,32,7,7

node[3].shape: 100,1,1,1568

node[4].shape: 100,1,1,100

node[5].shape: 100,1,1,100

node[6].shape: 100,1,1,10

MNISTIterator: load 60000 images, shuffle=1, shape=100,1,28,28

MNISTIterator: load 10000 images, shuffle=0, shape=100,1,28,28

initializing end, start working

round        0:[     600] 2 sec elapsed[1]      train-error:0.211783	test-error:0.0435

round        1:[     600] 3 sec elapsed[2]      train-error:0.0522667	test-error:0.0263

round        2:[     600] 5 sec elapsed[3]      train-error:0.0370833	test-error:0.0214

round        3:[     600] 7 sec elapsed[4]      train-error:0.0316167	test-error:0.023

round        4:[     600] 9 sec elapsed[5]      train-error:0.02905	test-error:0.0152

round        5:[     600] 11 sec elapsed[6]     train-error:0.0265167	test-error:0.0166

round        6:[     600] 13 sec elapsed[7]     train-error:0.0248333	test-error:0.0164

round        7:[     600] 15 sec elapsed[8]     train-error:0.0226667	test-error:0.0144

round        8:[     600] 17 sec elapsed[9]     train-error:0.0234167	test-error:0.0139

round        9:[     600] 19 sec elapsed[10]    train-error:0.0221	test-error:0.0152

round       10:[     600] 21 sec elapsed[11]    train-error:0.0218667	test-error:0.0121

round       11:[     600] 23 sec elapsed[12]    train-error:0.02025	test-error:0.0128

round       12:[     600] 24 sec elapsed[13]    train-error:0.01925	test-error:0.0142

round       13:[     600] 26 sec elapsed[14]    train-error:0.0194333	test-error:0.0129

round       14:[     600] 28 sec elapsed[15]    train-error:0.0190167	test-error:0.0114


updating end, 28 sec in all
At this point you can proceed to work with the examples provided by the cxxnet authors:
https://github.com/dmlc/cxxnet/tree/master/example
Distributed File System on Amazon Linux — XtreemFS
| 发表时间:2015-08-05 14:02:07 | 评论:0 |
[Introduction]
This article provides a quick started guide on how to set up and configure XtreemFS on Amazon Linux. Two EC2 instance are being launched to accomplish this goal. On both EC2 instances, there is an instance-store volume serving as the shared storage.
Edit /etc/hosts on both EC2 instances with the following entries (assuming that the private IP addresses are 172.31.0.11 and 172.31.0.12).
172.31.0.11	node01

172.31.0.12	node02
Then run the following commands to install the xtreemfs-server and xtreemfs-client packages:
$ cd cd /etc/yum.repos.d/

$ sudo wget "http://download.opensuse.org/repositories/home:/xtreemfs/CentOS_6/home:xtreemfs.repo"

$ sudo yum install xtreemfs-server

$ sudo yum install xtreemfs-client
[Configuration]
On both EC2 instances, create file system on the instance-store volume and mount it to /xtreemfs.
$ sudo mkdir -p /xtreemfs

$ sudo mkfs.ext4 /dev/xvdb

$ sudo mount /dev/xvdb /xtreemfs

$ sudo mkdir -p /xtreemfs/mrc/database

$ sudo mkdir -p /xtreemfs/mrc/db-log

$ sudo mkdir -p /xtreemfs/objs

$ sudo chown -R xtreemfs /xtreemfs
On both EC2 instances, modify /etc/xos/xtreemfs/mrcconfig.properties using the following values:
dir_service.host = node01

babudb.baseDir = /xtreemfs/database

babudb.logDir = /xtreemfs/db-log
On both EC2 instances, modify /etc/xos/xtreemfs/osdconfig.properties using the following values:
dir_service.host = node01

object_dir = /xtreemfs/objs
On node01, start all DIR, MRC and OSD services:
$ sudo service xtreemfs-dir start

$ sudo service xtreemfs-mrc start

$ sudo service xtreemfs-osd start
On node02, start MRC and OSD services:
$ sudo service xtreemfs-mrc start

$ sudo service xtreemfs-osd start
On one of the nodes, create a new volume:
mkfs.xtreemfs localhost/myvolume
On both nodes, mount the volume:
$ sudo mkdir /data

$ sudo chown -R ec2-user:ec2-user /data

$ mount.xtreemfs node01/myvolume /data
Now the shared file system has been set up, and you can create a text file under /data and observe that the file created appears on both EC2 instances.
If you create an AMI for large-scale deployment, please note that in /etc/xos/xtreemfs/mrcconfig.properties and /etc/xos/xtreemfs/osdconfig.properties there are UUID at the end of each file. On each node, the UUID should be different otherwise you will end up very messy. There is a generate_uuid script in the same folder. It is suggest that you do the following to make sure that your AMI works:
(1) Before creating the AMI, remove the UUID lines from the above-mentioned configuration files.
(2) When you launch the instance, use the user-data section to run a bash script to generate the UUID, as below:
#!/bin/bash

cd /etc/xos/xtreemfs

./generate_uuid mrcconfig.properties

./generate_uuid osdconfig.properties
Please bear in mind that this is only a quick start guide, and you should not use this configuration directly in a production system without further tunings.
Getting Started with AWS SDK for Java (2)
| 发表时间:2015-06-11 10:24:55 | 评论:1 |
This is the 2nd part of my tutorial on "Getting Started with AWS SDK for Java". If you have not already do so, I suggest that you first take a look at the first chapter of this set of training "Getting Started with AWS SDK for Java (1)" to properly set up your development environment. In this part, we will cover the Amazon RDS client, as well as some common issues when using RDS as the back end database for your Java applications.
[Amazon RDS Client]
In this section, we use the AmazonRDSClient to accomplish some basic tasks such as launching an RDS instance, listing all RDS instances in a particular region, as well as terminating a particular RDS instance. The related source code for this demo is DemoRDS.java (you can click on the link to view the source code in a separate browser tab). You should also take a look at the Java docs for the AmazonRDSClient to get yourself familiar with the various properties and methods.
First of all we create an instance of the AmazonRDSClient in the constructor, then set the region to ap-southeast-2. For debugging purposes, we enable logging using log4j.
public class DemoRDS

{

	public AmazonRDSClient client;

	final static Logger logger = Logger.getLogger(DemoRDS.class);


	/**

	 *

	 * Constructor

	 *

	 */


	public DemoRDS()

	{

		// Create the AmazonRDSClient

		client = new AmazonRDSClient();

		// Set the region to ap-southeast-2

		client.setRegion(Regions.AP_SOUTHEAST_2);

	}
To launch an RDS instance, you will need to create a CreateDBInstanceRequest object, then pass it to the createDBInstance() method of the AmazonRDSClient, which returns a DBInstance object. From the DBInstance object, you will be able to obtain information about the newly created RDS instance. Due to the asynchronous nature of AWS API calls, some information might not be available in the DBInstance object returned by the createDBInstance() method. For example, the DNS endpoint for the newly created RDS instance will not be available until several minutes later, therefore instance.getEndpoint() will return a null result. If you try to convert this null result into a String, you will get an exception.
	public String launchInstance()

	{

		System.out.println("\n\nLAUNCH INSTANCE\n\n");


		try

		{

			// The CreateDBInstanceRequest object

			CreateDBInstanceRequest request = new CreateDBInstanceRequest();

			request.setDBInstanceIdentifier("Sydney");	// RDS instance name

			request.setDBInstanceClass("db.t2.micro");

			request.setEngine("MySQL");

			request.setMultiAZ(false);

			request.setMasterUsername("username");

			request.setMasterUserPassword("password");

			request.setDBName("mydb");		// database name

			request.setStorageType("gp2");		// standard, gp2, io1

			request.setAllocatedStorage(10);	// in GB


			// VPC security groups

			ArrayList list = new ArrayList();

			list.add("sg-efcc248a");			// security group, call add() again to add more than one

			request.setVpcSecurityGroupIds(list);


			// Create the RDS instance

			DBInstance instance = client.createDBInstance(request);


			// Information about the new RDS instance

			String identifier = instance.getDBInstanceIdentifier();

			String status = instance.getDBInstanceStatus();

			Endpoint endpoint = instance.getEndpoint();

			String endpoint_url = "Endpoint URL not available yet.";

			if (endpoint != null)

			{

				endpoint_url = endpoint.toString();

			}


			// Do some printing work

			System.out.println(identifier + "\t" + status);

			System.out.println(endpoint_url);


			// Return the DB instance identifier

			return identifier;

		} catch (Exception e)

		{

			// Simple exception handling by printing out error message and stack trace

			System.out.println(e.getMessage());

			e.printStackTrace();

			return "ERROR";

		}

	}
To list all RDS instances, we simply call the describeDBInstances() method of the AmazonRDSClient. This method returns a list of DBInstance objects, and you need to traverse through the list to obtain information about each individual DBInstance object.
	public void listInstances()

	{

		System.out.println("\n\nLIST INSTANCE\n\n");

        	try

		{

			// Describe DB instances

			DescribeDBInstancesResult result = client.describeDBInstances();


			// Getting a list of the RDS instances

			List instances = result.getDBInstances();

			for (DBInstance instance : instances)

			{

				// Information about each RDS instance

				String identifier = instance.getDBInstanceIdentifier();

				String engine = instance.getEngine();

				String status = instance.getDBInstanceStatus();

				Endpoint endpoint = instance.getEndpoint();

				String endpoint_url = "Endpoint URL not available yet.";

				if (endpoint != null)

				{

					endpoint_url = endpoint.toString();

				}


				// Do some printing work

				System.out.println(identifier + "\t" + engine + "\t" + status);

				System.out.println("\t" + endpoint_url);

			}

	        } catch (Exception e)

		{

			// Simple exception handling by printing out error message and stack trace

			System.out.println(e.getMessage());

			e.printStackTrace();

		}

	}
To terminate an RDS instance, we need to create a DeleteDBInstanceRequest, then pass the DeleteDBInstanceRequest to the deleteDBInstance() method. In the DeleteDBInstanceRequest, you should at least specify the DB instance identifier and whether you want to skip the final snapshot for the RDS instance to be deleted. If you want to create a final snapshot, you will need to set the name of the final snapshot in the DeleteDBInstanceRequest object.
	public void terminateInstance(String identifier)

	{

		System.out.println("\n\nTERMINATE INSTANCE\n\n");

		try

		{

			// The DeleteDBInstanceRequest

			DeleteDBInstanceRequest request = new DeleteDBInstanceRequest();

			request.setDBInstanceIdentifier(identifier);

			request.setSkipFinalSnapshot(true);


			// Delete the RDS instance

			DBInstance instance = client.deleteDBInstance(request);


			// Information about the RDS instance being deleted

			String status = instance.getDBInstanceStatus();

			Endpoint endpoint = instance.getEndpoint();

			String endpoint_url = "Endpoint URL not available yet.";

			if (endpoint != null)

			{

				endpoint_url = endpoint.toString();

			}


			// Do some printing work

			System.out.println(identifier + "\t" + status);

			System.out.println(endpoint_url);

		} catch (Exception e)

		{

			// Simple exception handling by printing out error message and stack trace

			System.out.println(e.getMessage());

			e.printStackTrace();

		}

	}
Before running the demo code, please modify the source code with the appropriate arguments (such as the security groups when creating the RDS instance) for the API calls. It is recommended that you intentionally introduce some errors in the arguments to observe the logging information from the AWS SDK. The demo code comes with switches for each demo module. You can use the launch, list, and terminate switches to pick which demo module you would like to run. For example:
$ mvn compile

$ mvn package

$ java -cp target/demo-1.0-SNAPSHOT.jar -Dlog4j.configurationFile=log4j2.xml net.qyjohn.aws.DemoRDS launch

$ java -cp target/demo-1.0-SNAPSHOT.jar -Dlog4j.configurationFile=log4j2.xml net.qyjohn.aws.DemoRDS list

$ java -cp target/demo-1.0-SNAPSHOT.jar -Dlog4j.configurationFile=log4j2.xml net.qyjohn.aws.DemoRDS list

$ java -cp target/demo-1.0-SNAPSHOT.jar -Dlog4j.configurationFile=log4j2.xml net.qyjohn.aws.DemoRDS terminate

$ java -cp target/demo-1.0-SNAPSHOT.jar -Dlog4j.configurationFile=log4j2.xml net.qyjohn.aws.DemoRDS list

$ java -cp target/demo-1.0-SNAPSHOT.jar -Dlog4j.configurationFile=log4j2.xml net.qyjohn.aws.DemoRDS list
[JDBC Basics]
With Java, people interact with database using JDBC (Java Database Connectivity). This is done in a 4-step approach:
- loading the JDBC driver using a class loader
- establishing a connection using DriverManager
- working with the database
- close the connection
The JDBC drivers for MySQL, PostgreSQL, Oracle and SQL Server can be found from the following URL. You will need to put the corresponding JAR file into your CLASSPATH to make things work. In the third-party folder of our demo code, we provide a copy of MySQL Connector/J 5.1.35.
- MySQL Connector/J
- PostgreSQL JDBC Driver
- Oracle JDBC Driver
- Microsoft JDBC Driver for SQL Server
With JDBC, we connect to database using connection URL, which includes properties such as the hostname or IP address of the database server, the port number to use for the connection, the name of the database to work with, as well as username and password. For different database engines, the format of the connection URL is slightly different. The following pseudo-code provides example connection URLs for MySQL, PostgreSQL, Oracle and SQL Server. If you need a definitive guidance on constructing connection URL for a specific database engine, please refer to the following URL:
- JDBC Connection URL for MySQL
- JDBC Connection URL for PostgreSQL
- JDBC Connection URL for Oracle
- JDBC Connection URL for SQL Server
	// MySQL

	Class.forName("com.mysql.jdbc.Driver");

	String jdbc_url = "jdbc:mysql://hostname/database?user=username&password=password";

	Connection conn = DriverManager.getConnection(jdbc_url);


	// PostgreSQL

	Class.forName("org.postgresql.Driver");

	String jdbc_url = "jdbc:postgresql://hostname/database?user=username&password=password&ssl=true"";

	Connection conn = DriverManager.getConnection(jdbc_url);


	// Oracle

	Class.forName ("oracle.jdbc.OracleDriver");

	String jdbc_url = "jdbc:oracle:thin:@hostname:1521:orcl";

	Connection conn = DriverManager.getConnection(jdbc_url, "username", "password");


	// SQL Server

	Class.forName("com.microsoft.jdbc.sqlserver.SQLServerDriver");

	String jdbc_url = "jdbc:microsoft:sqlserver://hostname:1433;DatabaseName=database";

	Connection conn = DriverManager.getConnection(jdbc_url, "username", "password");
The following demo code provides an example on using MySQL Connector/J to connect to an RDS instance, then carry out some operations such as CREATE TABLE, INSERT, and SELECT in an infinite loop. The properties of the database (including hostname, database, username, password) are provided in a property file db.properties in the top level folder of the demo code. When we run the demo code, we load these properties from an InputStream. This way we do not need to provide database credentials in the source code. (The benefit of doing this is that when your database credentials changes, you do not need to recompile your Java code. All you need to do is to update the properties in db.properties.)
In this demo code we catch Exception in two levels - the first level Exception might occur when loading the property file (file does not exist, incorrect format, or required entry missing) or loading the MySQL JDBC driver (the JAR file is not in CLASSPATH), while the second level Exception might occur within the infinite loop (can not open a connection to the database, can not CREATE TABLE or execute INSERT or SELECT queries). When the first level Exception occurs, there are errors in the resource level, so we can't move forward at all. When the second level Exception occurs, there might be things that we can fix from within the RDS instance, so we simply print out the error messages and keep on trying using the infinite loop.
	public void runJdbcTests()

	{

		System.out.println("\n\nJDBC TESTS\n\n");

		try

		{

			// Getting database properties from db.properties

			Properties prop = new Properties();

			InputStream input = new FileInputStream("db.properties");

			prop.load(input);

			String db_hostname = prop.getProperty("db_hostname");

			String db_username = prop.getProperty("db_username");

			String db_password = prop.getProperty("db_password");

			String db_database = prop.getProperty("db_database");


			// Load the MySQL JDBC driver

			Class.forName("com.mysql.jdbc.Driver");

			String jdbc_url = "jdbc:mysql://" + db_hostname + "/" + db_database + "?user=" + db_username + "&password=" + db_password;


			// Run an infinite loop

			Connection conn = null;

			while (true)

			{

				try

				{

					// Create a connection using the JDBC driver

					conn = DriverManager.getConnection(jdbc_url);


					// Create the test table if not exists

					Statement statement = conn.createStatement();

					String sql = "CREATE TABLE IF NOT EXISTS jdbc_test (id INT NOT NULL AUTO_INCREMENT PRIMARY KEY, content VARCHAR(80))";

					statement.executeUpdate(sql);


					// Do some INSERT

					PreparedStatement preparedStatement = conn.prepareStatement("INSERT INTO jdbc_test (content) VALUES (?)");

					String content = "" + UUID.randomUUID();

					preparedStatement.setString(1, content);

					preparedStatement.executeUpdate();

					System.out.println("INSERT: " + content);


					// Do some SELECT

					sql = "SELECT COUNT(*) as count FROM jdbc_test";

					ResultSet resultSet = statement.executeQuery(sql);

					if (resultSet.next())

					{

						int count = resultSet.getInt("count");

						System.out.println("Total Records: " + count);

					}


					// Close the connection

					conn.close();


					// Sleep for some time

					Thread.sleep(20000);

				} catch (Exception e1)

				{

					System.out.println(e1.getMessage());

					e1.printStackTrace();

				}

			}

		} catch (Exception e0)

		{

			System.out.println(e0.getMessage());

			e0.printStackTrace();

		}

	}
After creating an RDS instance and update the properties in db.properties, you can run the JDBC tests using the following command. You can stop the execution of this demo using CTRL C.
$ java -cp target/demo-1.0-SNAPSHOT.jar -Dlog4j.configurationFile=log4j2.xml net.qyjohn.aws.DemoRDS jdbc


JDBC TESTS


INSERT: cc6294da-fb84-4c6f-aa49-a33804058d03

Total Records: 1

INSERT: 1d7c8940-79cc-45ca-948a-27b809bb9e69

Total Records: 2

INSERT: 32d1acc5-c9ed-4bce-a6cd-44e7ac38ff42

Total Records: 3

INSERT: 88923f13-5ecd-41c5-a437-2d51099c2ff5

Total Records: 4
[Cloud Specific Considerations]
When building applications on top of AWS, it is important to assume that everything fails all the time. With this in mind, you should always connect to your RDS instance using the DNS endpoint instead of the IP address obtained from a DNS server, because the IP address of your RDS instance will change when a Multi-AZ fail over or a Single-AZ recovery occurs. In the case of Multi-AZ fail over, the DNS endpoint will be resolved to the IP address of the new master. In the case of Single-AZ recovery, a new instance will be launched and the DNS endpoint will be resolved to the IP address of the new instance.
For example, if we do a "reboot with fail over" of the RDS instance while running our JDBC tests against the RDS instance, we will see the following output. An Exception occurs when the Multi-AZ fail over occurs because the JDBC driver fails to connect to the old master due to connection timeout. When the Multi-AZ fail over is completed, subsequent connections are make to the new master successfully. (This is why we put each set of test inside a try... catch block.)
$ java -cp target/demo-1.0-SNAPSHOT.jar -Dlog4j.configurationFile=log4j2.xml -Djava.security.manager=default net.qyjohn.aws.DemoRDS jdbc


JDBC TESTS


INSERT: 14a03563-325e-4dc3-8456-bdbc1fee3034

Total Records: 48

INSERT: ec28a659-fc64-4995-b434-760e8b3274ae

Total Records: 49

Communications link failure


The last packet sent successfully to the server was 0 milliseconds ago. The driver has not received any packets from the server.

com.mysql.jdbc.exceptions.jdbc4.CommunicationsException: Communications link failure


INSERT: d59f3e77-1a17-4bee-9056-018dde60fb27

Total Records: 50

INSERT: 4ef1b7c7-1de1-430f-a503-61227c4b1249

Total Records: 51
In the above-mentioned demo, the Java SE application successfully handle the Multi-AZ event. However, this might not be the case in a Java EE use case, where a security manger is in place. The reason is that in Java there is a networking property networkaddress.cache.ttl controlling the caching policy for successful name lookups from the name service (see Java Properties for details). A value of -1 indicates "cache forever". The default behavior is to cache forever when a security manager is installed (with Java EE applications, this is a common practice enforced by the application server). When a Multi-AZ fail over is completed, the operating system already sees the new DNS record for the RDS endpoint, but the Java application still keeps the old DNS record. The result is, when you have a Java EE application running in Tomcat, JBoss, or GlassFish, the application keeps on trying to reach the old master (which is no longer in service) and keeps on failing, until a restart of the application.
We can simulate this behavior with the same JDBC tests. Before doing this, we need to add the following security manager entry to /usr/lib/jvm/java-8-oracle/jre/lib/security/java.policy (You should replace /home/ubuntu/aws-sdk-java-demo with the actual path of your demo code folder). This policy grants AllPermission to our demo application, which is represented by the JAR in the target folder.
grant codeBase "file:/home/ubuntu/aws-sdk-java-demo/target/*"

{

	permission java.security.AllPermission;

};
Then we run our demo application again with the default security manager, then do another "reboot with fail over" of the RDS instance while running our JDBC tests. Now we should see that the application fails to open a connection to the RDS instance for ever. If you do a "dig" against the DNS endpoint of the RDS instance before and after the fail over, you will see that the operating system does see the change in DNS records.
$ java -cp target/demo-1.0-SNAPSHOT.jar -Dlog4j.configurationFile=log4j2.xml -Djava.security.manager=default net.qyjohn.aws.DemoRDS jdbc


JDBC TESTS


INSERT: b9b8cb31-5ef7-41ed-a1d6-96f430bb6cb2

Total Records: 52

INSERT: 9afa8447-0876-4af5-88ce-e2aa782f91f8

Total Records: 53

Communications link failure


The last packet sent successfully to the server was 0 milliseconds ago. The driver has not received any packets from the server.

com.mysql.jdbc.exceptions.jdbc4.CommunicationsException: Communications link failure


Communications link failure


The last packet sent successfully to the server was 0 milliseconds ago. The driver has not received any packets from the server.

com.mysql.jdbc.exceptions.jdbc4.CommunicationsException: Communications link failure
There are many different solutions to this issue, including (1) modifying the required system property in the java command line; (2) modifying the /usr/lib/jvm/java-8-oracle/jre/lib/security/java.security configuration file; (3) modifying the startup parameters of your application server; and (4) setting up a new value for networkaddress.cache.ttl directly in your Java code.
The first solution is to add a Dsun.net.inetaddr.ttl=0 (never cache) to your command line. As shown in the following example, with this setting our JDBC test is able to pick up the new DNS record after one Exception.
$ java -cp target/demo-1.0-SNAPSHOT.jar -Dlog4j.configurationFile=log4j2.xml -Djava.security.manager=default -Dsun.net.inetaddr.ttl=0 net.qyjohn.aws.DemoRDS jdbc


JDBC TESTS


INSERT: a8c1bcca-0335-4217-9f97-a3964f12c574

Total Records: 54

INSERT: 5fa1cb23-96b9-449f-98b8-b0184781d657

Total Records: 55

Communications link failure


The last packet sent successfully to the server was 0 milliseconds ago. The driver has not received any packets from the server.

com.mysql.jdbc.exceptions.jdbc4.CommunicationsException: Communications link failure


INSERT: 4e3c8e51-9857-4024-8dc2-5a86f442a260

Total Records: 56

INSERT: 9ad6ec95-159a-4291-852d-903a08efc065

Total Records: 57
The second solution is to set a value for the networkaddress.cache.ttl property (0 for never cache) permanently in /usr/lib/jvm/java-8-oracle/jre/lib/security/java.security. This can be done by adding the following one line to this configuration file:
networkaddress.cache.ttl=0
The third solution is to modify the startup parameters of your application server. In the case of Tomcat7, you can modify JAVA_OPTS in /etc/default/tomcat7 with the desired setting, as below:
# You may pass JVM startup parameters to Java here. If unset, the default

# options will be: -Djava.awt.headless=true -Xmx128m -XX:+UseConcMarkSweepGC

#

# Use "-XX:+UseConcMarkSweepGC" to enable the CMS garbage collector (improved

# response time). If you use that option and you run Tomcat on a machine with

# exactly one CPU chip that contains one or two cores, you should also add

# the "-XX:+CMSIncrementalMode" option.

JAVA_OPTS="-Djava.awt.headless=true -Dsun.net.inetaddr.ttl=0 -Xmx128m -XX:+UseConcMarkSweepGC"
The fourth solution is to set up a new value for networkaddress.cache.ttl directly in your Java code, as describe by this AWS documentation Setting the JVM TTL for DNS Name Lookups. If you have the ability to modify your code, this is the recommended way, because you have full control of the behavior of your application, regardless of the configuration of the underlying runtime environment. (In the example below, 60 indicates the new TTL is 60 seconds. This way you still have some caching, but the caching is not that aggressive.)
java.security.Security.setProperty("networkaddress.cache.ttl" , "60");
The above-mentioned "Communication link failure" is one of the most commonly seen errors when working with RDS MySQL instances. In most cases, this issue can be resolved by asking yourself the following questions:
- Does your security group allows the communication between your EC2 instance (or on premise server) to communicate with your RDS instance (do a telnet to port 3306 on the RDS instance for a quick test)?
- Is a connection pool being used? Do you validate the connection when checking it out from the connection pool? Existing connections in a connection pool might become invalid due to various reasons (for example, timeouts).
- Has the MySQL service daemon been restarted? With RDS, the MySQL service daemon automatically restarts after it is crashed due to various reasons (for example, out of memory errors).
- Is there a fail over event (Multi-AZ) or recovery event (Single-AZ)?
- Does the operating system has the correct DNS record (do a dig to verify)? Does your Java application has the correct DNS record (check networkaddress.cache.ttl)?
- Is there anything in MySQL error log?
Getting Started with AWS SDK for Java (1)
| 发表时间:2015-06-03 10:48:39 | 评论:2 |
This is an entry level tutorial on how to use the AWS SDK for Java to interact with the various AWS services. Although we will cover a little bit about Java programming basics but this is not a tutorial on the Java programming language itself. If you want to learn the Java programming language language, I strongly recommend that you go through The Java Tutorial which was developed by Sun Microsystems in the very early days (improved and refined by Oracle later on).
To avoid exposing your AWS credentials in your code, all the examples in this tutorial use the credentials from IAM roles to authenticate with the AWS services. To run these examples, you will need to launch an EC2 instance (in this tutorial, we use Ubuntu 14.04 as the testing environment) with an IAM role. The IAM role should have sufficient permission to access the various AWS services you would like to test. For more information on this topic, please refer to the AWS documentation on IAM Roles for EC2.
[Java 8 SDK, AWS SDK for Java, Demo Code]
Assuming that you have launched an EC2 instance with a Ubuntu AMI, let's SSH into the EC2 instance and install the Java 8 SDK:
$ sudo add-apt-repository ppa:webupd8team/java

$ sudo apt-get update

$ sudo apt-get install oracle-java8-installer


$ javac -version

javac 1.8.0_45

$ java -version

java version "1.8.0_45"

Java(TM) SE Runtime Environment (build 1.8.0_45-b14)

Java HotSpot(TM) 64-Bit Server VM (build 25.45-b02, mixed mode)
Now let's download and configure the AWS SDK for Java:
$ cd ~

$ wget http://sdk-for-java.amazonwebservices.com/latest/aws-java-sdk.zip

$ sudo apt-get install unzip

$ unzip aws-java-sdk.zip
Now you have a folder with the name aws-java-sdk-1.x.xx in your home folder. The AWS libraries reside in the lib sub-folder while third-party dependencies reside in the third-party sub-folder. In order to use these libraries, you will need to configure your CLASSPATH to point to these sub-folders one by one. However, for the convenience of this tutorial, we simply copy everything into our JRE's lib/ext sub-folder. With this approach, you don't need to worry about the CLASSPATH at all. (If you are using other versions of the Java SDK, you will need to replace the following commands with the actual location of your Java installation.)
$ sudo cp aws-java-sdk-*/lib/*.jar /usr/lib/jvm/java-8-oracle/jre/lib/ext/

$ sudo cp aws-java-sdk-*/third-party/*/*.jar /usr/lib/jvm/java-8-oracle/jre/lib/ext/
The demo code for this tutorial is available in my github repository. The demo project uses maven as the project management code. So, we will need to install maven and git, then clone the code from my github repository.
$ cd ~

$ sudo apt-get install maven git

$ git clone https://github.com/qyjohn/aws-sdk-java-demo
Now we try to build the project and run a test application:
$ cd aws-sdk-java-demo

$ mvn compile

$ mvn package

$ java -cp target/demo-1.0-SNAPSHOT.jar net.qyjohn.aws.App

Hello World!
At this point, you have successfully configured your development environment and are ready to move forward to the rest of this tutorial.
[Amazon EC2 Client]
In this section, we use the AmazonEC2Client to accomplish some basic tasks such as launching an EC2 instance, listing all EC2 instances in a particular region, as well as terminating a particular EC2 instance. The related source code for this demo is DemoEC2.java (you can click on the link to view the source code in a separate browser tab). You should also take a look at the Java docs for the AmazonEC2Client to get yourself familiar with the various properties and methods.
We create an instance of the AmazonEC2Client in the constructor. At the same time, we specify which region we are going to use. You should always specify a region when manipulation AWS resources, unless the resource you are operating on is global (for example, IAM).
public class DemoEC2

{

	public AmazonEC2Client client;


	/**

	 *

	 * Constructor

	 *

	 */


	public DemoEC2()

	{

		// Create the AmazonEC2Client

		client = new AmazonEC2Client();

		// Set the region to ap-southeast-2

		client.setRegion(Regions.AP_SOUTHEAST_2);

	}
To launch an EC2 instance, you will need to create a StartInstancesRequest object, then pass it to the startInstances() method of the AmazonEC2Client, which returns a StartInstancesResult object. As shown in the following demo code, the StartInstancesRequest object contains information such as the AMI, the instance type, the key pair, the subnet, the security group, the number of instances to be launched. Many many other options can be supplied to the StartInstancesRequest object. You will need to refer to the API docs when needed.
	public String launchInstance()

	{

		System.out.println("\n\nLAUNCH INSTANCE\n\n");


		try

		{

			// Construct a RunInstancesRequest.

			RunInstancesRequest request = new RunInstancesRequest();

			request.setImageId("ami-fd9cecc7");	// the AMI ID, ami-fd9cecc7 is Amazon Linux AMI 2015.03 (HVM)

			request.setInstanceType("t2.micro");	// instance type

			request.setKeyName("desktop");		// the keypair

			request.setSubnetId("subnet-2dc0d459");	// the subnet

			ArrayList list = new ArrayList();

			list.add("sg-efcc248a");			// security group, call add() again to add more than one

			request.setSecurityGroupIds(list);

			request.setMinCount(1);	// minimum number of instances to be launched

			request.setMaxCount(1);	// maximum number of instances to be launched


			// Pass the RunInstancesRequest to EC2.

			RunInstancesResult  result  = client.runInstances(request);

			String instanceId = result.getReservation().getInstances().get(0).getInstanceId();


			// Return the first instance id in this reservation.

			// So, don't launch multiple instances with this demo code.

			System.out.println("Launching instance " + instanceId);

			return instanceId;

		} catch (Exception e)

		{

			// Simple exception handling by printing out error message and stack trace

			System.out.println(e.getMessage());

			e.printStackTrace();

			return "ERROR";

		}

	}
To list all the EC2 instances in a region, we simply call the describeInstances() method with no argument, which returns a DescribeInstancesResult. In the DescribeInstancesResult, traverse through all the Reservation, which is stored in a List. Each Reservation includes one or more EC2 Instance, which is also stored in a List. You can get the information for each EC2 instance from the Instance object.
The concept of Reservation seems to be confusing, and many people mistakenly think that it is the same as Reserved Instances but in fact it is not. According to the boto documentation, a reservation corresponds to a command to start instances. If you launch two EC2 instance in one batch (for example, specifying the number of instances in the EC2 Console), this particular Reservation will have two EC2 instances. You can stop and started the EC2 instances to change their state, but this will not change their Reservation.
	public void listInstances()

	{

		System.out.println("\n\nLIST INSTANCE\n\n");

        	try

		{

			// DescribeInstances

			DescribeInstancesResult result = client.describeInstances();


			// Traverse through the reservations

			List reservations = result.getReservations();

			for (Reservation reservation: reservations)

			{

				// Print out the reservation id

				String reservation_id = reservation.getReservationId();

				System.out.println("Reservation: " + reservation_id);

				// Traverse through the instances in a reservation

				List instances = reservation.getInstances();

				for (Instance instance: instances)

				{

					// Print out some information about the instance

					String id = instance.getInstanceId();

					String state = instance.getState().getName();

					System.out.println("\t" + id + "\t" + state);

				}

			}


	        } catch (Exception e)

		{

			// Simple exception handling by printing out error message and stack trace

			System.out.println(e.getMessage());

			e.printStackTrace();

		}

	}
To terminate an EC2 instance, you will need to create a TerminateInstancesRequest object. The TerminateInstancesRequest object accepts a List of EC2 instance id through the setInstanceIds() method. Then you pass the TerminateInstancesRequest to the AmazonEC2Client's terminateInstances() method, which returns a TerminateInstancesResult object. In the TerminateInstancesResult object, you have a List of InstanceStateChange, and each InstanceStateChange object contains information about the EC2 instance id, it's previous state, and it's current state.
	public void terminateInstance(String instanceId)

	{

		System.out.println("\n\nTERMINATE INSTANCE\n\n");

		try

		{

			// Construct the TerminateInstancesRequest

			TerminateInstancesRequest request = new TerminateInstancesRequest();

			ArrayList list = new ArrayList();

			list.add(instanceId);			// instance id

			request.setInstanceIds(list);


			// Pass the TerminateInstancesRequest to EC2

			TerminateInstancesResult result = client.terminateInstances(request);

			List  changes = result.getTerminatingInstances();

			for (InstanceStateChange change : changes)

			{

				String id = change.getInstanceId();

				String state_prev = change.getPreviousState().toString();

				String state_next = change.getCurrentState().toString();

				System.out.println("Instance " + id + " is changing from " + state_prev + " to " + state_next + ".");

			}

		} catch (Exception e)

		{

			// Simple exception handling by printing out error message and stack trace

			System.out.println(e.getMessage());

			e.printStackTrace();

		}

	}
Now you can make modifications to the demo code (in DemoEC2.java) with your preferred AWS region, AMI, instance type, along with other information. You can run the demo code using the following commands:
$ mvn compile

$ mvn package

$ java -cp target/demo-1.0-SNAPSHOT.jar net.qyjohn.aws.DemoEC2
This demo will launch one EC2 instance, list all the EC2 instances in the region, terminate the EC2 instance we just launched, and list all the EC2 instances in the region again. In order to demonstrate the state changes, we do a sleep of 10 seconds between each API call. After you have completed this exercise, you should intentionally introduce some errors in the code to observe the various exceptions thrown by the demo code. For example, you can point your AmazonEC2Client to use the us-east-1 region, but specify a subnet id or a security group id in another region.
[Logging Considerations]
When you encountered an error when making an API call using the AWS SDK for Java, the chance is that you have some mistake in the AWS resource you specified in the code, while the code itself is completely valid. In order to debug such issues, you will need to know what information is being sent to the AWS endpoint, and what information is returned from the AWs endpoint. In the dark age, debugging an application can only be achieved by looking into the Java object containing the request and result, then print out the information one by one using System.out.println(). Fortunately you don't need to do this with the AWS SDK for Java, because the AWS SDK for Java is instrumented with Apache Commons Logging. All you need to do is grab a recent copy of log4j and set up the proper CLASSPATH, then ask your application to use the proper log4j configuration file.
In this demo, we have the JAR files for log4j version 2.3 in the third-party folder. we simply copy everything into our JRE's lib/ext sub-folder. With this approach, you don't need to worry about the CLASSPATH at all.
$ cd third-party

$ sudo cp *.jar /usr/lib/jvm/java-8-oracle/jre/lib/ext/
The log4j configuration file log4j2.xml, which is located at the top level folder of the demo code. You should refer to the log4j manual to understand how log4j works. To enable log4j for our demo application, you simply need to uncomment the Logger line in DemoEC2.java, as below:
public class DemoEC2

{

	public AmazonEC2Client client;

	final static Logger logger = Logger.getLogger(DemoEC2.class);
After that, you will need to compile and package the demo code again. When running the Java application, you will need to pass the log4j configuration file to the java command:
$ mvn compile

$ mvn package

$ java -cp target/demo-1.0-SNAPSHOT.jar -Dlog4j.configurationFile=log4j2.xml net.qyjohn.aws.DemoEC2
As you can see, when you run the application, the request you send to the AWS endpoint, as well as the response from the AWS endpoint, are now display on your screen. With this information, it is a lot easier to debug your API calls to AWS endpoints.
By now we have completed the first chapter of this "Getting Started with AWS SDK for Java" tutorial. In the future I will publish more on this topic on a irregular base. Hopefully I will be able to cover the majority of AWS services that we use on a daily base. So, please stay tuned for my future updates.



| 更晚内容 | 更早内容 |
云与清风常拥有,
冰雪知音世难求。
击节纵歌相对笑,
案上诗书杯中酒。
2020年12月31日
洛杉矶
最新评论
2026-07-23 11:37:04
qyjohn 评论了 《几句翻译》
2026-07-21 20:11:28
wells 评论了 《几句翻译》
2025-11-15 06:29:51
qyjohn 评论了 《青桔》
2025-11-14 01:55:04
wells 评论了 《青桔》
2025-10-24 18:04:06
Ted Wang 评论了 《关于作者(About Me)》
2025-03-27 08:28:09
Max 评论了 《父亲走了》
2025-03-08 04:13:52
W 评论了 《我不想颂扬普京大帝》
2024-07-22 16:02:03
云思 评论了 《无题》
2024-06-27 10:01:54
yiming 评论了 《致访客(Welcome)》
2024-05-06 08:50:06
qyjohn 评论了 《致访客(Welcome)》
2024-05-03 19:49:00
jimmie 评论了 《致访客(Welcome)》
2024-02-19 03:32:57
林小静 评论了 《埋剑渡》
2024-01-05 03:54:28
路过者 评论了 《2023年度盘点》
2024-01-04 10:22:05
qyjohn 评论了 《致访客(Welcome)》
2024-01-04 08:05:13
qyjohn 评论了 《2023年度盘点》